Zoom

Zoom is an external learning tool that can be used for conducting webinars, meetings, and office hours. This tool is available directly in your D2L. Zoom can be used to meet with students or colleagues from the comfort of home or office. These sessions can be recorded to help students with a difficult topic and uploaded to course content in D2L.
Along with this page of resources, we offer a variety of sessions covering different functionalities of Zoom. Browse our sessions in My Learning.
Links
The following links may help answer any questions you might have about Zoom.
Documents
The following documents can be shared or distributed for the purposes of understanding how to access or use Zoom.
Tutorials
Getting Started
- Scheduling Meetings on D2L 🡕
- Signing into Zoom with BC Credentials
- Accessing Zoom in D2L 🡕 (for students)
Audio, Video, & Sharing
Engaging Features
Virtual Backgrounds
Signing into Zoom with BC Credentials
Please make sure you are connecting to your class from the link in D2L, and you are using the college Zoom account to log into Zoom with SSO using the following steps:
- Select Sign In
- Select Sign In with SSO
- Enter “broward-edu” in the text box, click continue
- You will be redirected to OneLogin
- Launch the Zoom client (from OneAccess portal if necessary)
- Enter your OneLogin credentials.
- The Zoom client will load.
For more detailed instructions, visit this link.
How to Use Zoom Meeting Controls
Configuring Audio & Video
Recording a Zoom Meeting
Using Polls
Using Breakout Rooms
Using Whiteboards
- Start or join a Zoom meeting.
- Click on the Share Screen
 on the meeting toolbar.
 - Click Whiteboard.

- Click Share.
- Use the page controls in the bottom-right corner of the whiteboard to create new pages and switch between pages.

- When you are done, click Stop Share.
For more detailed instructions on how to use whiteboards, visit this link.
Enabling Annotations for Others
Annotations are a way for you and other meeting participants to draw on a shared screen or whiteboard during the meeting.
You can toggle annotations during a meeting, and you can also have them defaulted in your settings.
Setting Toggle
In your Zoom settings, you can decide whether to enable annotations.

Meeting Toggle
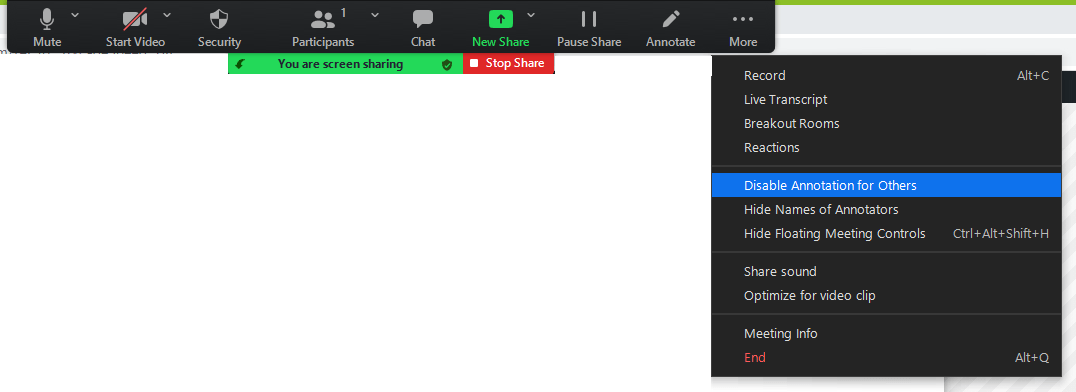
When you are sharing, you can decide whether to enable or disable annotation for others within the meeting by clicking More and then selecting Disable/Enable Annotation for Others.

Using Annotations
Annotation controls will display whenever you share a screen or whiteboard. To access annotation, follow these steps:
- Start or join a Zoom meeting.
- Click on the Share Screen
 on the meeting toolbar.
 - Click on the Annotate button on the toolbar.

- You will see the following tools:

- Mouse: Deactivate annotation tools and switch to your mouse pointer. This button is blue if annotation tools are deactivated.
- Select (only available if you started the shared screen or whiteboard): Select, move, or resize your annotations. To select several annotations at once, click and drag your mouse to display a selection area.
- Text: Insert text.
- Draw: Insert lines, arrows, and shapes.
- Stamp: Insert predefined icons like a check mark or star.
- Spotlight: Displays your mouse pointer to all participants when your mouse is within the area being shared. Use this to point out parts of the screen to other participants.
- Arrow: Displays a small arrow instead of your mouse pointer. Click to insert an arrow that displays your name. Each subsequent click will remove the previous arrow placed. You can use this feature to point out your annotations to other participants.
- Vanishing Pen (only available if you started the shared screen or whiteboard): Allows the presenter to annotate on the whiteboard or shared screen without having to erase or undo their last addition, as the annotation will fade away within a couple of seconds.
- Eraser: Click and drag to erase parts of your annotation.
- Format: Change the formatting options of annotations tools like color, line width, and font.
- Undo: Undo your latest annotation.
- Redo: Redo your latest annotation that you undid.
- Clear: Delete all annotations.
- Save: Save shared screen / whiteboard and annotations as a PNG or PDF. The files are saved to the local recording location.
For more detailed instructions on how to enable and use annotations, visit this link.


